by Kirsten McGoey | Apr 14, 2026 | Ajax, Art, Bowmanville, Brooklin, Copyright, Durham Region, Durham Region Acting Headshots, Durham Region Family Photographer, Educational, Events, Family Photographer, Family Photos, Magic, Markham, Modern, Oshawa, Oshawa Family Photographer, Photography, Port Perry, Scarborough, Storytelling, Trinity Design, Uxbridge, Whitby
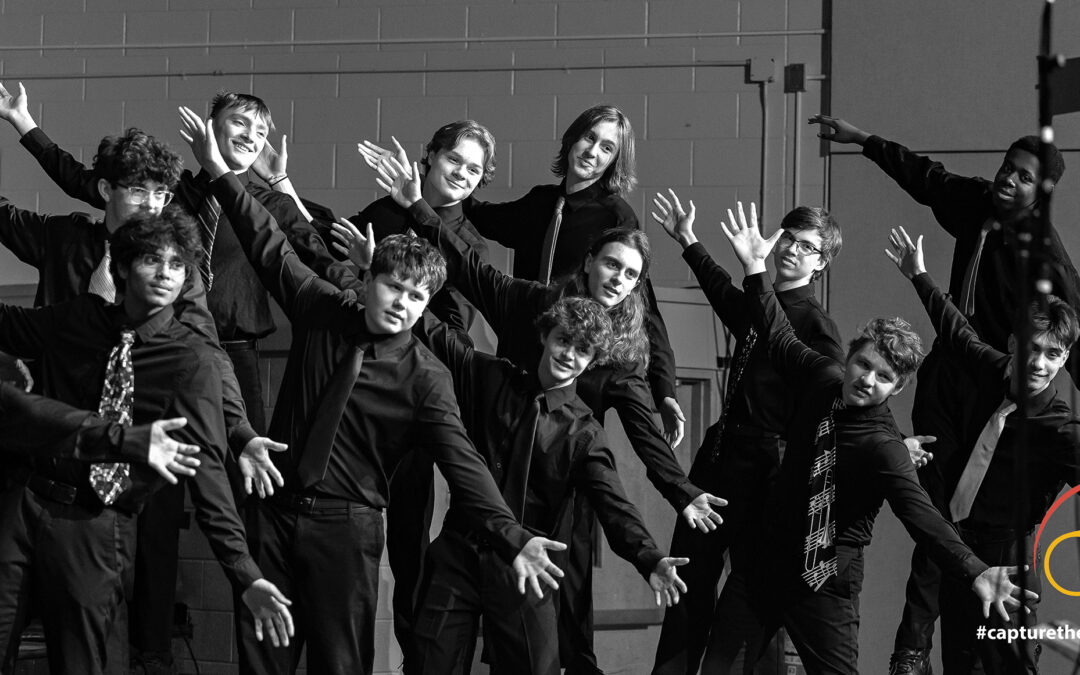
Family, friends and supporters spent a lovely evening with the students participating in the choral programming and recently the Ontario Choral Festival.
The Choral Festival Showcase gave a taste of the wonderful songs that were performed at the Ontario Choral Festival. All of our participants are invited to Nationals which is a big sign of the talent within these walls.
Soloists gave stellar performances, accompanied by talented staff and students on the piano – including Nancy Allison who also teaches in the Instrumental program. The choirs are lead by Erin Collins who teaches in the Vocal program. Dylan Billings is a steadfast presence running the sound and lighting and we have so many students who help plan and run the event.
Programming in the OCVI Performing Arts is self funded so every performance helps the program exist for our students. It is a special place with special staff, students and families who all believe in the arts as a foundation for a life well lived.
Visual Storyteller
Trinity Design Photography has served the Durham Region for over 13 years and counting. They offer a variety of retail and commercial photography services for your family and your business.

by Kirsten McGoey | Oct 31, 2025 | Ajax, Art, Bowmanville, Brooklin, Copyright, Durham Region, Educational, Events, Magic, Modern, Oshawa, photographer, Photography, Port Perry, Storytelling, Trinity Design, Uxbridge, Whitby
O’Neill Performing Arts present the annual Fall Concert 2025.
We enjoyed performances from:
🥁 Concert Band
🎺 Symphonic Winds
🎶 Senior Winds
🎷 OJ1, OJ2, OJ3
🎤 Chamber Choir
🎼 Treble Voices
🎟️Tickets were $5
A night of amazing performances and support our talented performing arts students on October 30th at 7:00pm (ending just before 9 p.m.).
Follow the program to attend upcoming performances, I hear the Christmas event is something special.
_________________________________________________________________________________________________________________________________
Kirsten McGoey, Visual Storyteller

by Kirsten McGoey | May 5, 2025 | Ajax, Ajax Family Photographer, Ajax headshot photographer, Ajax headshot photographer, Bowmanville, Bowmanville Family Photographer, Bowmanville headshot photographer, Brooklin, Brooklin Family Photographer, Brooklin headshot photographer, Copyright, Courtice Family Photographer, Courtice headshot photographer, Durham Region, Durham Region Acting Headshots, Durham Region Family Photographer, Educational, Family Photographer, Family Photos, Graduate, Graduation, Headshot, Local Business, Magic, Markham, Modern, Orono headshot photographer, Oshawa, Oshawa Family Photographer, Oshawa headshot photographer, photographer, Photography, Pickering headshot photographer, Port Perry, Port Perry Family Photographer, Portraits, Print the Experience, Storytelling, Trinity Design, Uxbridge, Uxbridge headshot photographer, Whitby, Whitby Family Photographer, Whitby headshot photographer
Our photography studio creates graduate photographs for students graduating in the Durham Region from Senior Kindergarten all the way to University.
We have a series of v-stoles in our studio, gowns and hats and would love to work with you to capture this milestone in your education journey. We offer studio session and lifestyle graduate packages on location in the Durham Region at this time.
Our studio sessions can be our “One and Done” sessions or our larger “Lifestyle Graduate” package (which we adapt to the studio with your input). You are welcome to use to the gowns*, stoles and props we have in the studio – but due to the large variety of colours we cannot have every school in stock.
Some of the schools we do have include:
- EA Fairman PS (dark blue, red, dark blue – triple vstole)
- Henry Street High School (purple, gold purple – triple vstole, reverse too)
- Brooklin High (teal, white, teal – triple vstole)
- Anderson CVI (red, white, black – triple vstole)
- (red, white, red – triple vstole)
- (red, medium blue, white – triple vstole)
- (red, medium blue, white – triple vstole)
- (green, white, green – triple vstole)
- (teal, white, black – triple vstole)
- We also have some single stoles in silks but they are not as nice as the vstoles above which is now the industry standard. (Note: each stole is $45+ shipping so we add a few each year due to the cost, cost as of 2025 Spring.)
Where possible we also will adapt existing stoles to the colour (if photoshop allows for the change).
Post secondary stoles are not something we stock as there are too many variations. * Gowns we have in various sizes – SK in blue/red matte, black gowns in a variety of sizes, green and dark blue gowns.
Our studio has soft white faux tulips and we can forma faux diploma. The SK graduates really have fun with the props and we have large sized pencils just in this year to add to those moments.
Our lifestyle work allows us to break out of the studio and into the location settings. These are not group sessions (aka one grad per package) but one on one sessions with your graduate to document their graduation at a local park, mural or other space in your town/city.
Our graduates are encouraged to wear their suit or dress under their gown so we can capture both. Bring your sport or interest along – we can showcase your love of “soccer”, a photo with your pet or a photo with your siblings. But ideally the focus is on you during this session – a gown/hat image, a suit/dress image and a few creative shots in between.
The end result is a keepsake that you will cherish for a lifetime and can gift to loved ones.
Want to know more about our packages?
Want to see our graduate portfolio? Graduates
Send us a connect form!
Kirsten McGoey | Visual Storyteller

by Kirsten McGoey | Sep 8, 2024 | Ajax, Art, Bowmanville, Brooklin, Business Content, Copyright, Durham Region, Editorial, Educational, Events, Family Photographer, Family Photos, Food Photographer, Headshot, Licensing, Local Business, Markham, Modern, Oshawa, photographer, Photography, Port Perry, Scarborough, Sports Photography, Storytelling, Trinity Design, Whitby
The idea of who owns the copyright for photography is perhaps the most important part of running a successful photography business. Without it the landscape to earn a living wage is diminished so if you are just starting out or perhaps need a refresher we are here to help. If you are a new or existing client we would love you to read along.
A partnership with your photographer is a wonderful thing and we know it’s important to sometimes explain how are services are set up and our fees calculated. This allows for that photographer to stay in business as your photographer for many, many years to come.
What is Copyright in Canada?
“For all artistic works, the author of the work is the first owner of its copyright. The author may then assign the copyright to another person. Determining who is the “author” of a photograph will depend on when the photo was taken since the process, as outlined in the Copyright Act, was amended by the passing of the Copyright Modernization Act in 2012.” (CIPPIC, https://www.cippic.ca/articles/copyright-and-privacy-in-photography)
So we need to look at work created before and after 2012 when the Copyright Modernization Act came into place.
Before 2012 – “photograph authorship fell under a special regime in the Copyright Act. When a photo was taken, the copyright, by default, belonged to the person who owned the film negative, or digital camera at the time the photograph was taken. This means that the photographer was not necessarily the author of the photograph.” (CIPPIC)
Thankfully this has changed because this would be for clients and photographers alike hard to keep track of. With the rise of digital cameras and phones the law was updated in 2012 under the Copyright Modernization Act.
After 2012 – “As of November 2012, the author of a photograph is the person who takes the photo. This brings photo authorship in line with the rules governing other “Artistic Works” such as paintings, drawings and sculptures.” (CIPPIC)
Why Photographers Do Not Give Up Copyright
AppRevenue streams that come from being able to sell licenses to use photography is a revenue stream for photographers.
Just like an author sells books in a quantity, a photographer – when appropriate – sell multiple licenses to create revenue from content they have created. Clients may ask for a time period where the content is exclusive or to buy copyright, but this then would be sold at a much higher cost as revenue streams then are lost to them. (Note: Resale is more on the commercial side, not so much for retail).
By selling a license to content the photographer remains in control of the use of the work they create. This ensures that the work is not used by the organization without the photographer’s input. For example, I recently had to ask images I made for a client to not be used to advertise images another photographer was taking for them. The images were not representing to their clientele what they would receive and were not created for that use. The exchange was cordial as likely they had no idea about the copyright on the images they used.
When the budgets to create content are constantly lowering and the fees to run a business increase copyright ensures the right to earn a living wage. In our industry operational costs versus income determine our fee structure but sadly many photographers do not understand the cost of doing business.
When we do as a photographer we ensure a strong business that can serve you and your organization for years to come with reliable services and new skills. After almost 12 years in business I know it has made my business viable.
Licencing Types of Photography
(There are two main areas of photography that photographers like myself work in.
The first is retail photography which is defined as B2C or business (that’s me) to consumer (that’s you hiring me for personal photography). In B2C I provide services such as family photography, graduation photos and so on (it would also include weddings).
On the other side I also provide commercial photography – defined at B2B or business (that’s me) to your business (that’s any business you run or work on behalf of). In B2B I cover events, create content for magazines, shoot headshots for employees and create content for ad campaigns.
In both cases I release content with a license that defines how it can be used.
For retail this typically is for personal use and doesn’t get too picky, for example, if you want to add it to a family album. But you cannot on the flip side get married and then provide the images to vendors as the license doesn’t allow for sharing beyond your own personal use. It also might ask you not to edit with filters and the like so as not to represent our work in a way that it wasn’t given to you. As mentioned before we do not typically resell on this side of the services we offer, using it only to ensure it represents us and is not used for commercial purposes.
For commercial the points of use are often negotiated – depending on the use, duration and budget – this can look different from client to client. A client might ask for exclusive use for a time period or in some rare cases to buy the content outright. The latter is demonstratively more expensive and is rarely in line with the budget so licensing is standard in the industry.
Working with Photographers
Building a relationship with your photographer through licensing their work is a great asset to your business.
We already spoke in an earlier article to the pitfalls of using stock images and know using fresh content is a stronger option for a successful brand.
It also means you have a reliable, local provider who understands your business and will be in business for many years to come.
Want to work with us – connect with us via the website form: Connect
Kirsten McGoey | Visual Storyteller

by Kirsten McGoey | Jun 3, 2024 | Acting, Acting Headshots, Ajax, Ajax headshot photographer, Ajax headshot photographer, Art, Bowmanville, Bowmanville headshot photographer, Brooklin, Brooklin headshot photographer, Courtice headshot photographer, Durham Region, Durham Region Acting Headshots, Educational, Magic, Markham, Modern, Orono headshot photographer, Oshawa, Oshawa headshot photographer, photographer, Photography, Pickering headshot photographer, Pickering headshot photographer, Port Perry, Scarborough, Storytelling, Trinity Design, Uxbridge, Uxbridge headshot photographer, Whitby, Whitby headshot photographer
Join us as we show you how a professional theatre production can be captured in Dress Rehearsals to support your production later in the week. Henry Street High School has a long standing tradition of great theatre and they delivered a great production of Mamma Mia! this year. Here we go again!
I am looking for the big emotional and physical moments in a play. This is infinitely made harder as I have rarely seen the play and sometimes notes about what to look for are not given. I watch to see where I can see the shots I want to make and often take a series of twenty to just get the right smile, eyes open and touch of nose or sassy look. Practice for them also applies to theatre photography, the more you do the more you know what to look for.
What I loved about the play this year was this black light sequence. It was so seamlessly blended into the story and the choreography was just amazing. It allows more of the ensemble to show off the depth talent at Henry. It was a great storytelling technique for the dream sequence and I was delighted I got some good frames as it’s the definition of “low light”.
When photographing theatre you will be faced with light changes, sometimes from moment to moment, sometimes one side is a different scene than the other. It’s always worth mentioning it to the tech team, sometimes the lights are like in Mamma Mia full of colour and capturing that is on point.
Every now and then a part is so perfect you could not imagine anyone else playing it. Meet Stella who plays Rosie in the production and nailed this part. Her physical comedy is spot on and I laughed, clapped and cheered her on in her pursuit of Bill. Bravo! A dash of her work is below:
I mean with ABBA as the soundtrack and a strong plot there is just not much you can say about this play that would be negative. The performances were amazing, the leads for performance 1 and 2 changed for 3 and 4 so we have tried to show you both casts as much as we could.
Stage Director : Skylar is rarely in front of the camera or on the stage but without her and the team there would be no performance. She guides the performance (her 6th with Henry) with skill and confidence – always smiling and ready to make it happen. We will miss you as you are moving on to post secondary.
Kirsten McGoey | Visual Storyteller

by Kirsten McGoey | Jun 29, 2022 | Ajax, Bowmanville, Brooklin, Business Content, Durham Region, Educational, Local Business, Magic, Markham, Modern, Oshawa, photographer, Photography, Plant based eating, Scarborough, Storytelling, Trinity Design, Uxbridge, Vegan, Whitby
You can also scan this QR code with your phone to access the guide or click the image.
Kirsten McGoey | Visual Storyteller | Trinity Design Photography


Recent Comments